How To Set Up Your Own Okta App (SAML)
Last updated 08/06/2026
Step 1
Log in to your Okta account as an Administrator.
Step 2
In the left navigation, click the Applications dropdown, then click on Applications.
Step 3
On the Applications page, click the Create App Integration button.
Step 4
- For Sign-on method, select SAML 2.0.
- Click Next.

Step 5
For Application Name, enter your organization’s name. Then, click Next.

Step 6
- For Single sign-on URL enter:
https://api.breadbutter.io/callback - For Audience URI (SP Entity ID) enter your App ID (App ID can be found under Settings in Bread & Butter)

Step 7
Click Show Advanced Settings, ensure that the following are set:
- Response set to Signed
- Assertion Signature set to Signed
- Assertion Encryption set to Unencrypted
Click Next.

Step 8
- Select This is an internal app that we have created.
- Click Finish.

Step 9
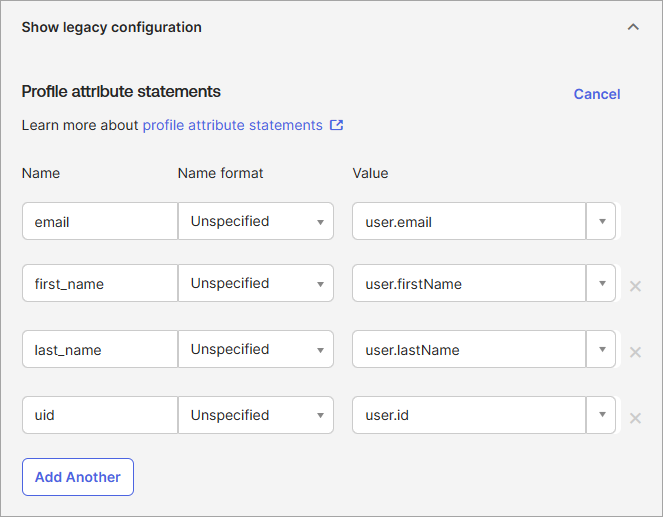
Go to the Sign On tab, scroll down to Attribute Statements, and expand Show legacy configuration.
Add the following entries under Profile attribute statements:
- Name email and value user.email
- Name first_name and value user.firstName
- Name last_name and value user.lastName
- Name uid and value user.id (please note that you will need to type this value, as it is not in the dropdown)
Click Save.
Step 10
- Go to the Sign On tab and scroll down to SAML Signing Certificates.
- Click Actions, then View IdP Metadata for the active certificate.

Step 11
- Take note of the entityID as your Identity Provider Issuer.
- Take note of the Location as your Identity Provider Single Sign-On URL.
- Take note of the X509Certificate value.
- Use these values in step 13.

Step 12
Go to the Assignments tab and assign your users or groups to this Okta app.
Step 13
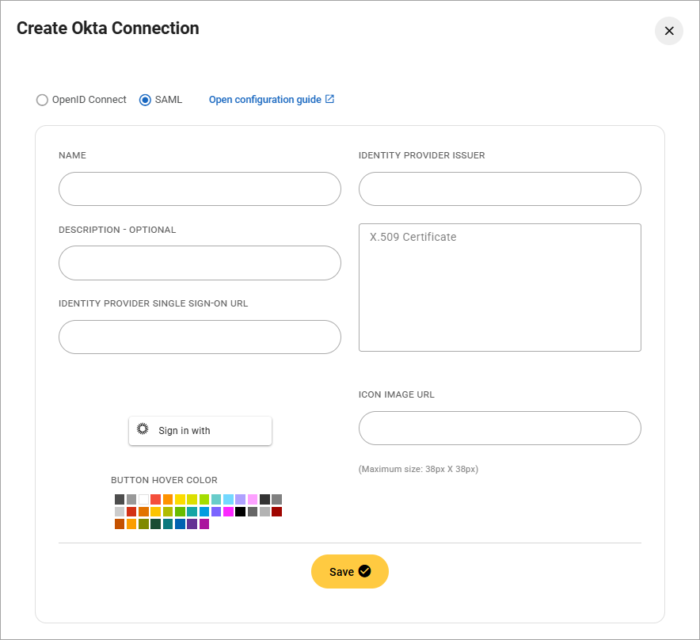
Bread & Butter Setup:
- Go to https://app.breadbutter.io/sign-in/
- Click Sign In and authenticate (or Sign Up make a new account and authenticate).
- Go to Settings in the left menu, then go to the Global Conversion Methods tab.
- Click on the Okta button under Global Conversion Methods > Enterprise Connections.
- Choose SAML for the protocol.
- Enter a name.
- Enter a description (optional).
- Enter the Identity Provider Single Sign-On URL from the Okta setup instructions above.
- Enter the Identity Provider Issuer from the Okta setup instructions above.
- Enter the X.509 Certificate from the Okta setup instructions above. Do not include -----BEGIN CERTIFICATE----- and -----END CERTIFICATE-----.
- Click Save.
- Enable Okta by clicking the new entry in the Okta Identity Providers list.