Custom Microsoft Identity Provider
Last updated 06/03/2025
Step 2
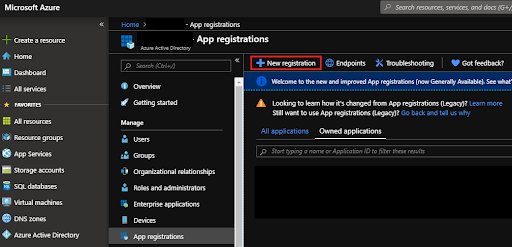
Under Azure services, click on App registrations.
If you don't see it, click on "more services" and search for it.

Step 3
Click New Registration

Step 4
- Enter a name for your application (we recommend using your organization name)
- Select Multitenant for the supported account types.
- Set the Redirect URI to Web then enter:
https://api.breadbutter.io/callback
Note: Please ensure that the account type is Multitenant. This allows any Microsoft user to authenticate and log in. Single Tenant restricts login to your domain only.

Step 5
- Click Register. After the application is created, copy and save the Client ID for the last step below.

Step 6
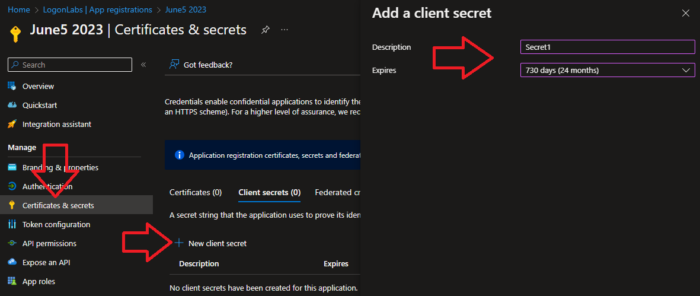
- In the left menu under Manage click on Certificates & Secrets, and then click on New client secret.
- Enter a description, set your desired expiry, and then click Add.
- Set a reminder for yourself to replace this Secret before it expires. If the Secret expires, your users will no longer be able to log in with the provider.

Step 7
- Your Secret value will be generated automatically, and you must copy this Secret value down immediately; the value will be hidden forever if you navigate away from the page, so you must regenerate a new one if the value is lost

Step 8
In the left menu, click on Branding & properties. Then enter your Privacy Policy URL, Terms of service URL, and any other branding options you would like.
Step 9
Bread & Butter Setup:
- Go to https://app.breadbutter.io/sign-in/
- Click Sign In and authenticate (or Sign Up make a new account and authenticate).
- Go to Settings in the left menu.
- Click on Microsoft under SSO Settings > Social Accounts.
- Select "Set Microsoft for Production".
- Enter a custom name and description.
- Enter the Client ID from the Microsoft setup steps above.
- Enter the Client Secret from the Microsoft setup steps above.
- Click Save.
- Click the checkbox next to your new Microsoft provider to enable it.

Don’t use Bread & Butter? Want to learn more about how Bread & Butter solves the four biggest problems facing marketers today? Book a demo and see how Bread & Butter is helping marketers make the most of their first-party data
Add authentication & API event tracking to your website/app with a script tag & configuration

