Custom Salesforce Identity Provider
Last updated 06/03/2025
Step 2
Click on your account icon at the top right of the page, and select My Developer Account. If you don't see this option, skip to the next step.
Note: You may be asked to authenticate again.
Step 3
Click on the settings icon at the top right of the page, and select Setup.

Step 4
In the left menu, go to Platform Tools > Apps > App Manager.
Step 5
Click the New Connected App button at the top right.

Step 6
Choose Create a Connected App, and then click Continue.

Step 7
- Enter your contact information.
- For the name of your application, we recommend using your organization or company name.

Step 8
Under API (Enable OAuth Settings), check the Enable OAuth Settings option.
Step 9
For the Callback URL, enter:
https://api.breadbutter.io/callback
Step 10
For Selected OAuth Scopes, select and add the following:
- Access unique user identifiers (openid)
If you need the user's Access Token by enabling Authorization Data in Bread & Butter, please also add:
- Perform requests at any time (refresh_token, offline_access)
Note: If you enable Authorization Data without adding the above Scope, users will be blocked from logging in by Salesforce.

Step 11
Uncheck Require Proof Key for Code Exchange (PKCE) Extension for Supported Authorization Flows.

Step 12
- Check the Configure ID Token option.
- More options will appear. Also check the Include Standard Claims option.
- Click Save, then Continue.

Step 13
- Under API (Enable OAuth Settings) click the Manage Consumer Details button.
- Confirm your account access, if prompted
- Copy and save the Consumer Key and Consumer Secret for the Bread & Butter setup below.

Step 14
(Optional) If you intend to enable Authorization Data to use Access Tokens and Refresh Tokens, please follow these steps to ensure that the Refresh Token settings are correct:
- In the left menu, go to Apps > Connected Apps > Manage Connected Apps.
- Click Edit for your App.
- Ensure that Refresh Token Policy is not set to expire immediately. Instead set to Refresh Token is valid until revoked, or one of the other expiry time periods, depending on your internal policies.

Step 15
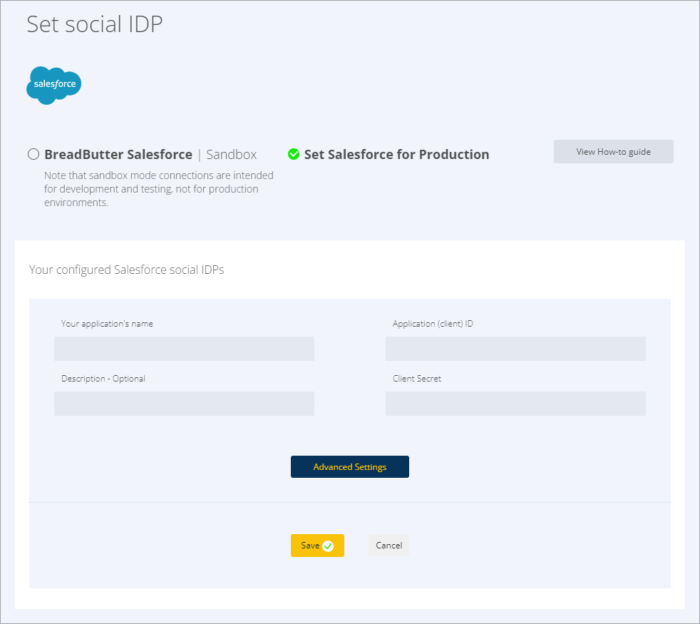
Bread & Butter Setup:
- Go to https://app.breadbutter.io/sign-in/
- Click Sign In and authenticate (or Sign Up make a new account and authenticate).
- Go to Settings in the left menu.
- Click on Salesforce under SSO Settings > Social Accounts.
- Select "Set Salesforce for Production".
- Enter a custom name and description.
- Enter the Consumer Key from the Salesforce setup steps above into the Application (client) ID field.
- Enter the Consumer Secret from the Salesforce setup steps above into the Client Secret field.
- Click Save.
- Click the checkbox next to your new Salesforce provider to enable it.

Don’t use Bread & Butter? Want to learn more about how Bread & Butter solves the four biggest problems facing marketers today? Book a demo and see how Bread & Butter is helping marketers make the most of their first-party data
Add authentication & API event tracking to your website/app with a script tag & configuration

