WordPress Opt-in Tool
Last updated 02/28/2025
You can add the Bread & Butter Opt-in tool to any page on your site. The Opt-in window appears after a specified number of seconds. It prompts users to subscribe through a trusted account or using an email address.
Bread and Butter remembers who has signed up, and won’t prompt subscribers again. The Opt-in tool will be hidden for 24 hours for users who dismiss it without authenticating.

You can add the Opt-in tool to any page on your site, and configure the content you want it to display, including background image.
Step 1
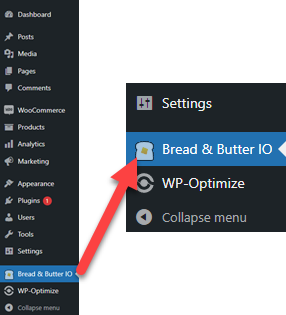
In the left menu in WordPress Admin, click on Bread & Butter.
Step 2
Go to the Opt-in Tool tab, then select the webpages or post categories that you want the Opt-in tool too appear. You can choose one or many pages.

Step 3
Choose the Opt-in type. This setting will pre-populate suggested text, and a custom event name for you. You can also edit the text any time you want.

Step 4
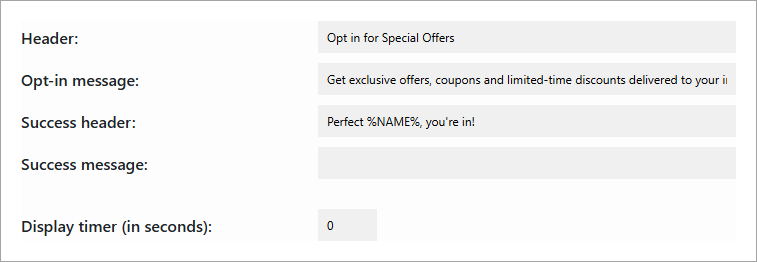
Set up the messaging that will prompt the user to sign up.
- The Header is the text that appears at the top of the window.
- The Opt-in message is the main body of text in the window. This should explain what your through the Opt-in tool is, and why the user would want to sign up.
- The Success header is the header message that users see after they have signed up successfully.
- The Success message is the main message that users see after they have signed up successfully.
- The Display timer is the number of seconds after the page loads that the Opt-in tool appears.
Step 5
Set up the image header. You can choose the default image included in the WordPress plugin, your own custom image, or no image.
- For Header Image there are four options:
- Default Image - Uses the default image (default if not specified).
- Fill - crops and resizes your custom image to fit the entire space in the header.
- Center - Crops and resizes your custom image to fit a 200x100px space in the header.
- No Image - No image in the header.
- Header Image URL is optional. If you want to add your own custom image, enter the source URL of the image you want to use. Choose 'Fill' or 'Center' for the image type, depending on how you want it to look.

Step 6
(Optional) Enable Override Registration Destination URL if you've set a Registration Destination URL in your app settings, but want that to not apply to Content Preview pages.
If you do not have a Registration Destination URL set in your app settings, you can ignore this setting.
Step 7
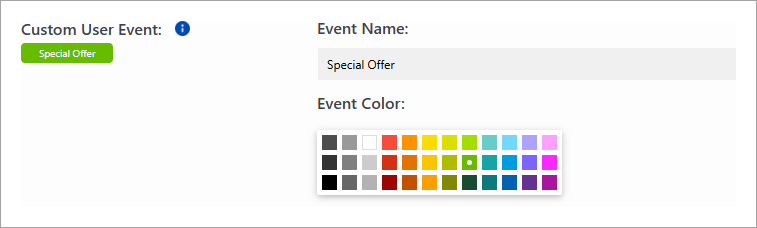
Set up a Custom User Event that will be triggered in your dashboard whenever a user signs up through the Opt-in tool.
- Choose a name. You can see how this will appear in your Webapp dashboard when a user triggers this event.
- Choose a color.
Step 8
When a user signs up through the Opt-in tool, you can trigger a direct integration with either Mailchimp or Zapier. For example, you can add a user directly to any audience in Mailchimp, or trigger any Zap.
To set up your Mailchimp integration, follow these steps.
To set up your Zapier integration, follow these steps.
You can also skip this step and set up your own custom integration from the Logic page in your Webapp.
Step 9
Click Save to save and apply your changes.
The through the Opt-in tool will now appear on the page(s) you specified in Step 2.
Next Steps
- Set up more rules that trigger additional integrations.
- Add your through the Opt-in event to your dashboard's User Journey.
Need custom settings per page?
All Opt-in tool settings can be configured at the page level, allowing you to have different content and behavior for specific pages. Just follow these quick steps:
- Open the page editor for the page or post.
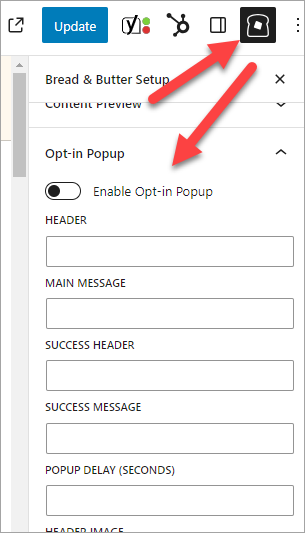
- Click the Bread & Butter logo at the top right, or click on the Options button, and selecting Bread & Butter under Plugins.
- Expand the Opt-in Popup section in the right panel.
- Click Enable, and then make your changes.
Don’t use Bread & Butter? Want to learn more about how Bread & Butter solves the four biggest problems facing marketers today? Book a demo and see how Bread & Butter is helping marketers make the most of their first-party data


Seeing changes in your match rates? With the end of third-party cookies & new regulations on how data can be shared (GDPR, CCPA or Data Protection Laws), what are you doing to make sure you aren’t caught out?
FUTURE PROOF YOUR DATA - LEARN MOREAdd authentication & API event tracking to your website/app with a script tag & configuration