Webflow Content Gate Classic
Last updated 05/06/2025
Before adding content gate classic, make sure you have added the initialization script tag.
Bread & Butter’s content gate feature allows you to limit access to specific web pages on your website to visitors that have authenticated. When the user goes to the page, the content is partially hidden by the content gate sign in popup, and the background is greyed out and scrolling is blocked. It can be configured to appear immediately, after a period of time, or when a user scrolls past a certain percent of the page.

You can also customize the header text to meet your unique business needs. Once signed in, users can see the page content.
You can now add the Content Gate Classic feature to your website by following these steps:
Step 1
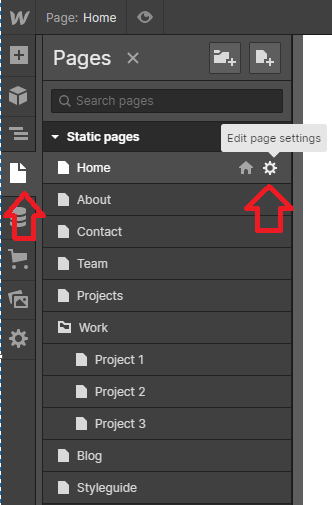
- In Designer, open Pages in the left nav.
- Hover over Home (or any other page).
- Click the gear icon to open the page settings.

Step 2
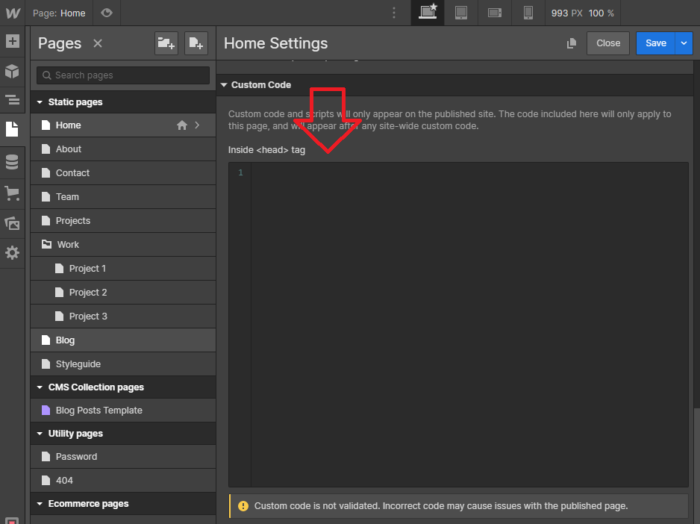
Select the Custom Code tab.

Step 3
In the Head tag field, paste in the following script tag after the Bread & Butter initialization script tag:
<script>
null == window.breadbutterQueue && (window.breadbutterQueue = []), window.injectBreadButter = function (e) { "undefined" != typeof BreadButter && BreadButter.init ? e() : window.breadbutterQueue.push(e) };
injectBreadButter(function () {
    BreadButter.ui.contentGating({
    locale: {
        CONTENT_GATING: {
            TITLE: "Your header goes here",
            SUBTITLE: "Your sub header goes here"
        }
    },
    scroll_limit: 0,
    time_limit: 0,
    image_source: 'IMAGE_URL',
    image_type: 'IMAGE_TYPE'
});
});
</script>
Note: If you have other Bread & Butter feature snippets, just add this snippet below them.

Step 4
Set any time or scroll delays.
- For scroll_limit, choose a value between 0 and 1. Setting it to 0 will load immediately, 0.5 after half of the page is scrolled through, etc. Make sure to set the time value very high if you want the content gate to be triggered primarily through the scrolling action of the user.
- For time_limit, choose the number of seconds after page load until content gating is displayed.
Step 5
Set the TITLE text & SUBTITLE text. This is the content that appears at the top of the Content Gate Classic tool.
Step 6
For the header image, you can choose the default image, your own custom image, or no image.
- For IMAGE_TYPE there are four options:
- default - Uses the default image (default if not specified).
- fill - crops and resizes your custom image to fit the entire space in the header.
- center - Crops and resizes your custom image to fit a 200x100px space in the header.
- none - No image in the header.
- IMAGE_URL is optional. If you want to add your own custom image, replace IMAGE_URL with the source URL of the image you want to use. Choose 'fill' or 'center' for the image type, depending on how you want it to look.
Step 7
- Click Save Changes.
- Publish your website, when ready.
Don’t use Bread & Butter? Want to learn more about how Bread & Butter solves the four biggest problems facing marketers today? Book a demo and see how Bread & Butter is helping marketers make the most of their first-party data
Add authentication & API event tracking to your website/app with a script tag & configuration

