Webflow Custom Fields for Registration
Last updated 02/14/2024
With Bread & Butter, you can set custom fields that your users are asked to enter after they register. For example, you may want to know their company name, phone number, company size or industry.
After your users complete the login process, they’ll see a dialog like the following:
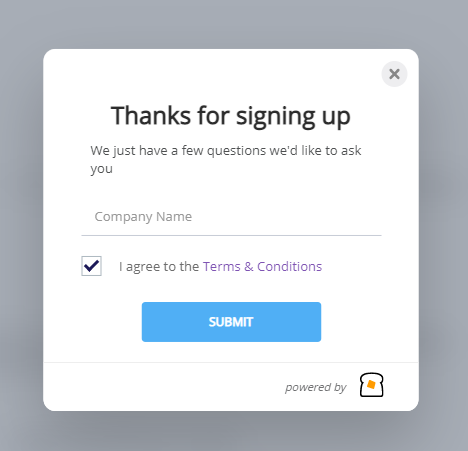
Some key features of the custom fields for registration dialog:
- The header and sub header text is fully configurable.
- You can set as many textbox fields, or checkbox fields as you want.
- Any textbox or checkbox can be flagged as mandatory – users can’t proceed until they enter it.
- You can set whether a checkbox is checked by default or not.
- The checkbox display names can include links to external pages.
For example, if you want to add 2 text boxes, a mandatory checkbox, and have custom text, this is what you would add:
For the display content in the locale object:
- HEADER is the topmost content in the dialog, as seen in the screenshot above.
- SUB_HEADER is the content just below that.
- SUBMIT is the label on the Submit button.
- MANDATORY is the error message that displays under mandatory fields when the user doesn’t select them.
For the actual registration fields:
- custom_key is the unique identifier under which the value will be stored in Bread & Butter. If integrating with a CRM via an integration, this is the key you’ll be mapping with. It is important that this key is unique.
- display_name is the label text that will be displayed with your text box or checkbox field.
- type is where you select whether it is a text box or a check box. Allowed values are ‘textbox’ or ‘checkbox’.
- mandatory is whether the field is required for the user to submit or not. Allowed values are true or false.
- default_value applies only to checkboxes. This lets you set whether the checkbox is auto selected or not. Allowed values are true for auto checked, false for not auto checked.
Once you’ve constructed the fields and display information you’d like to set (using the format in the example above), follow these steps to add the content to the head code for your site. If you need any assistance, please don’t hesitate to contact our support team.
Step 1
- On your Webflow Dashboard, click on the 3 dots at the bottom right of your project.
- Then, select Settings.

Step 2
Select the Custom Code from the left menu.

Step 3
In the Head Code field, add the locale and custom code after the App ID in the initialization script.
If you need any assistance with this step, please feel free to contact our support team.

Step 4
- Click Save Changes.
- Publish your website, when ready.
Don’t use Bread & Butter? Want to learn more about how Bread & Butter solves the four biggest problems facing marketers today? Book a demo and see how Bread & Butter is helping marketers make the most of their first-party data


Seeing changes in your match rates? With the end of third-party cookies & new regulations on how data can be shared (GDPR, CCPA or Data Protection Laws), what are you doing to make sure you aren’t caught out?
FUTURE PROOF YOUR DATA - LEARN MOREAdd authentication & API event tracking to your website/app with a script tag & configuration