Custom Domain Branding – Update Providers
Last updated 03/26/2026
As part of the custom domain branding setup process, you’ll need to add your domain into the allowed redirect URLs for all of the custom providers you’ve set up. Below are the steps to do this for each provider.
IMPORTANT: If you haven’t set up your custom providers yet, you must do that first. When setting up your providers, make sure you add both callback URIs:
https://api.breadbutter.io/callback
https://auth.[yourdomain.com]/callback
You can get started here.
First, make sure you have your redirect URI ready. This will be the subdomain you set up the CNAME record for, with HTTPS in front, and /callback after. For example:
https://auth.yourdomain.com/callback
GitHub & Basecamp don’t support multiple redirect URIs, so for these you’ll need to create a 2nd provider in Bread & Butter, and enable this once the domain branding setup is complete and you’ve received confirmation from us. Specific instructions for these providers are shown below.
Social Identity Provider Update Steps:
Microsoft does not allow you to add Redirect URLs with different root domains to one app. Therefore, you will need to follow the Custom Microsoft Identity Provider steps to create a second app for your new redirect URL.
Once set up, and the custom domain branding is enabled, you can enable this second app.

- Log in to the Google Cloud Console: https://console.cloud.google.com/
- Select the Project that your app was created under.
- In the left pane (or under Quick Access on the page), click on APIs & Services, then Credentials.

- Choose the OAuth 2.0 client that you set up previously.
- In the Authorized redirect URIs section, Add URI.

- Enter in your new redirect URI, then click Save.

- Log in to the developer site of Facebook: https://developers.facebook.com/
- Click on My Apps at the top right, then click on the app that you created previously.
- In the left menu, select Use Cases, then the Customize button.

- In the menu, click Settings, then go to the Valid OAuth Redirect URIs section and add your new redirect URI. Click Save Changes.


- Log in to the LinkedIn Developer site using your LinkedIn account: https://www.linkedin.com/developers/
- Click on My Apps at the top right, then click on the app that you created previously.
- Click on the Auth tab, then go to the OAuth 2.0 settings section.
- In the Authorized redirect URLs for your app section, add your new redirect URI and click Update.


- Log in to the Slack Developer site using your Slack account: https://api.slack.com/
- Click Your Apps in the top right, then choose the app that you set up previously.
- In the left menu, go to OAuth & Permissions.
- In the Redirect URLs section, Add New Redirect URI.

- Enter in your new redirect URL, click Add, then click Save URLs.

- Log in to the QuickBooks Developer site using your Quickbooks/Intuit account: https://developer.intuit.com/app/developer/homepage
- Click My Hub > App dashboard in the top right, then choose the app that you set up previously.
- Click Settings in the left menu, then go to the Redirect URIs tab.
- Click Add URI, and enter your new redirect URL. Then click Save.


Github does not allow you to add multiple Redirect URLs to one app. Therefore, you will need to follow the Custom Github Identity Provider steps to create a second app for your new redirect URL.
Once set up, and the custom domain branding is enabled, you can enable this second app.

Basecamp does not allow you to add multiple Redirect URLs to one app. Therefore, you will need to follow the Custom Basecamp Identity Provider steps to create a second app for your new redirect URL.
Once set up, and the custom domain branding is enabled, you can enable this second app.

- Log in to the developer site of Dropbox: https://www.dropbox.com/developers/
- Click App Console in the top menu, then choose the app that you set up previously.
- Under the Settings tab, go to the Redirect URIs section.
- Enter in your new redirect URL, then click Add.


- Log in to the Planning Center Developer site using your Planning Center account: https://api.planningcenteronline.com/oauth/applications
- Find the app that you created previously, and click Edit.
- Under Authorization callback URLs, enter in your new redirect URL and then click Update.


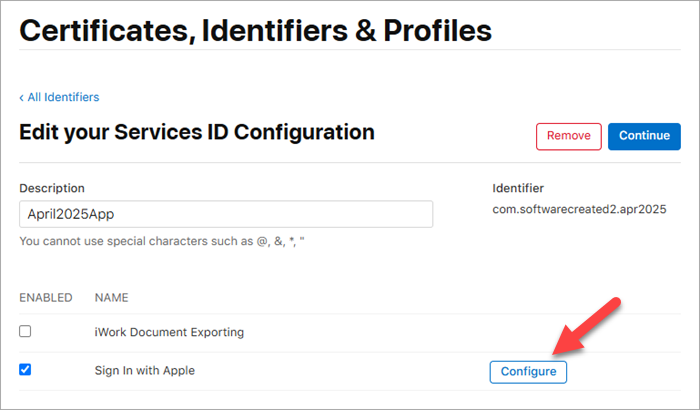
- Sign in to your Apple Developer account: https://developer.apple.com/
- Click Account in the top menu.
- Click on Identifiers under the Certificates, IDs & Profiles section on the page.
- Navigate to Services IDs by using the dropdown on the right. Then, select the app that you created previously.

- Click Configure, next to Sign in with Apple.
- Next to Website URLs, click the + button.
- Under Domains and Subdomains, add the domain of your redirect URI, including subdomain.
Under Return URLs, add your new redirect URI.
- Click Next, then click Done.

- Log in to the developer site of Twitch: https://dev.twitch.tv/console/apps
- Find the app that you created previously, and click Manage.
- Under OAuth Redirect URLs, click Add, then enter your new redirect URL.

- Click Save at the bottom of the page.
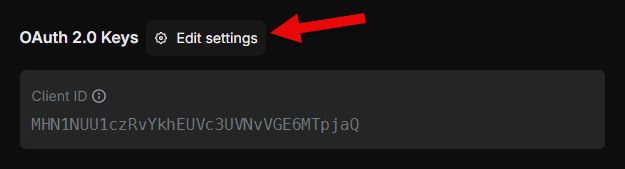
- Log in to the developer site of X/Twitter: https://developer.twitter.com
Note: After logging in, you may need to go back to the Developer URL above. - Click Developer Portal at the top right of the page.
- Click on Apps in the left menu, and then select the app that you created previously.
- Next to OAuth 2.0 Keys, click Edit Settings.
- Under App info, Callback URI / Redirect URL, click Add another and then enter in your new redirect URL.

- Click Save Changes at the bottom of the page.
- Log in to the developer site of Salesforce: https://developer.salesforce.com/
- In the left menu, go to Apps > App Manager, then find your app in the list.
- For you app, click the down arrow at the far right, and click Edit.
- Under the API (Enable OAuth Settings) section, add your new Callback URL.

- Click Save at the bottom of the page.
Enterprise Identity Provider Update Steps:
OAuth
- Log in to your Okta account as an Administrator.
- In the left navigation, click the Applications dropdown, then click on Applications. Then, select the app that you created previously.
- Under the General tab, click Edit for the General Settings section.
- Under the Login > Sign-in redirect URIs, click Add URI and then enter in your new redirect URL.

- Click Save.
SAML
Okta SAML does not allow you to add multiple Redirect URLs to one app. Therefore, you will need to follow the Custom Okta SAML Identity Provider steps to create a second app for your new redirect URL.
Once set up, and the custom domain branding is enabled, you can enable this second app and disable your existing Okta SAML app.

OAuth
- Log in to your OneLogin account.
- Navigate to the Administration panel, then go to the Applications tab. Then, select the app that you created previously.
- In the left menu, go to Configuration, then enter in your new redirect URL in the Redirect URI’s section.

- Click Save at the top right.
SAML
OneLogin SAML does not allow you to add multiple Redirect URLs to one app. Therefore, you will need to follow the Custom OneLogin SAML Identity Provider steps to create a second app with your new redirect URL.
Once set up, and the custom domain branding is enabled, you can enable this second app and disable your existing OneLogin SAML app.
OAuth
See the Microsoft Social step at the top of this page.
SAML
Microsoft SAML does not allow you to add multiple Redirect URLs to one app. Therefore, you will need to follow the Custom Microsoft SAML Identity Provider steps to create a second app with your new redirect URL.
Once set up, and the custom domain branding is enabled, you can enable this second app and disable your existing Microsoft SAML app.
OAuth
See the Google Social step at the top of this page.
SAML
Google SAML does not allow you to add multiple Redirect URLs to one app. Therefore, you will need to follow the Custom Google SAML Identity Provider steps to create a second app with your new redirect URL.
Once set up, and the custom domain branding is enabled, you can enable this second app and disable your existing Google SAML app.